|
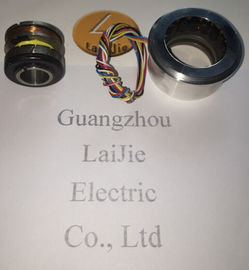
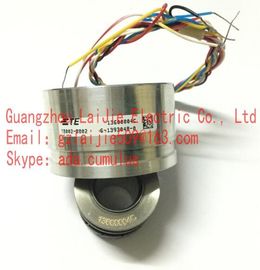
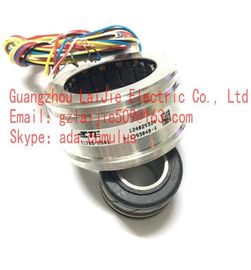
| Place of Origin: | America |
| Brand Name: | TYCO |
| Certification: | CE |
| Model Number: | V23401-H6009-D601 |
| Minimum Order Quantity: | 1PCS |
|---|---|
| Packaging Details: | carton |
| Delivery Time: | in stock |
| Payment Terms: | T/T, Western Union, MoneyGram |
| Supply Ability: | 10000PCS/WEEK |
| TYCO: | TYCO | V23401-H6009-D601: | V23401-H6009-D601 |
|---|---|---|---|
| COLOR: | BLACK | Temperature: | 20-120 |
| Material: | Iron | Wire: | Wire |
| Demention: | 50mm |
Guang Zhou Lai Jie Electric Co.,LTD
Please contact with “Tommy” for the price
V23401-H6009-D601
V23401-H1002-B114V23401-T1002-B122
| In the "Options" menu, select the "Settings" entry. The "Settings" dialog opens. | |
| Click the Options tab | |
| Change the individual settings as required by marking or clearing the check boxes. |
V23401-H1002-B102
V23401-T1005-B114
V23401-H1005-B114
V23401-T1005-B122
V23401-H1005-B122
V23401-T1005-B101
V23401-H1005-B101
V23401-T1005-B102
V23401-H1005-B102
V23401-T1009-B114
V23401-H1009-B114
V23401-T1009-B122
V23401-H1009-B122
V23401-T1009-B101
V23401-H1009-B101
V23401-T1009-B102
V23401-H1009-B102
V23401-T2001-B214
V23401-H2001-B214
V23401-T2001-B222
V23401-H2001-B222
V23401-T2001-B201
V23401-H2001-B201
![]()
![]()
![]()
![]()
In the Settings window, you can make basic settings in order to adjust the appearance and behavior of the page layout editor to meet your needs. The settings will be saved and retained when you open the page layout editor again.
This is where you can set: ● whether the objects should snap to the grid, ● whether the grid should be visible, ● the distance between the grid points
This is where the fundamental program settings are changed, for example what should happen with altered program settings when the program is closed, or how objects should be selected and edited
This is where you choose which units of measurement you would like to use for entering the size of coordinates, text height and line width.
This is where the appearance and properties for the menu bar, toolbar and palettes can be set, for example whether the standard toolbar should be configurable, whether the keyboard shortcuts should be shown, etc.
In order to be able to work precisely in the working area, you can show a grid on the working area with the "Display Grid" function. If you also have the "Snap to Grid" function switched on, all newly created objects will be automatically aligned to the grid points.
Snap to Grid Determines whether the objects should be positioned anywhere on the drawing area or aligned to the grid. Display grid Determines whether the grid should be visible or not. If the grid is invisible, objects still align to it when the "Snap to Grid" option is switched on. Width in/ Height in Changes the distance between grid points as necessary. Set the units for the size entry in the "Units" tab. The grid width to be set is oriented to the size and variety of objects and to the desired positioning precision.
In the "Options" menu, select the "Settings" entry. The "Settings" dialog opens. 2. Change the individual settings as required by marking or clearing the check boxes
. If you want to keep the dialog open to make changes in other tabs, confirm the changes you have made with the "Apply" buttoThe minimum grid separation that can be displayed on the screen is 10 pixels. If you set a smaller value (e.g. 6 pixels), you can still align your objects to this grid, but the next even numbered multiple of this value > 10 pixels will be displayed on the screen (in this case 12 pixels).
n. 4. Save the settings with "OK".
On the options tab, you can set whether the configuration settings in this dialog are saved when the program is closed. This is also where you can choose the method of selecting objects.
Save settings on exit Determines whether the settings for the page layout editor are saved when the program closes. Object selection Surrounding/touching Surrounding: A frame will be drawn when the left mouse button is held down, so that all objects that are completely within this frame will be selected. Touching: A frame will be drawn when the left mouse button is held down, so that all objects touched by this frame will be selected. Always reset object type selection If this option is enabled, an object will be deselected as soon as it is pasted into the layout. If the option is disabled, the object will remain selected after it has been pasted into the layout. With this method, you can paste the same object several times without having to reselect the object.
If you want to keep the dialog open to make changes in other tabs, confirm the changes you have made with the "Apply" button. 5. Save the settings with "OK".
Flat style for toolbars Determines whether the buttons on the toolbar and palettes are displayed with a border or without. Display move handles Determines whether the buttons on the toolbar and palettes are displayed with move handles or without. Display buttons in the menu Determines whether the buttons on the toolbar will be shown in the menus on the menu bar. Display all shortcuts Determines whether the keyboard shortcuts for the menu commands will be shown in the menus on the menu bar. Deactivated buttons in color Determines whether deactivated buttons on the toolbar and palettes are displayed in color or grayed out. Standard toolbar: customizable Determines whether the standard toolbar can be changed. If this option is enabled, the "Toolbar" dialog can be opened with [ALT+double-click]. Standard toolbar: Drag&drop with ALT key active If this option is enabled, the icons on the toolbar can be moved or removed with the mouse by holding down the ALT