 |
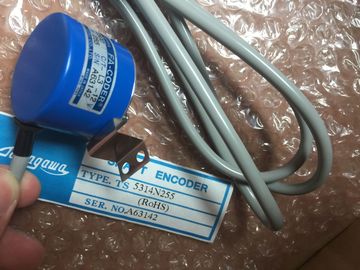
| Place of Origin: | Japan |
| Brand Name: | Tamagawa |
| Certification: | CE |
| Model Number: | TS5778N157 |
| Minimum Order Quantity: | 1pcs |
|---|---|
| Packaging Details: | carton |
| Delivery Time: | in stock |
| Payment Terms: | T/T, Western Union, MoneyGram |
| Supply Ability: | 100pcs/week |
| TAMAGAWA: | TAMAGAWA | TS5778N157: | TS5778N157 |
|---|---|---|---|
| Japan: | Japan | Material: | Iron |
| Color: | Black | Temperature: | 20-130 |
| Wire: | Wire | Demention: | 50mm |
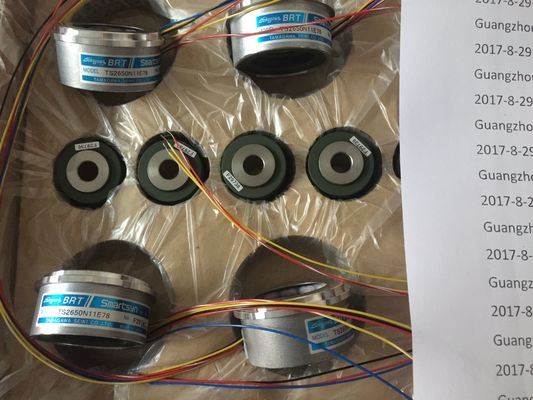
TS3103N156
TS5778N157
TS3617N2E6
TS3617N2E7
TS3617N3E8
TS3617N3E9
TS3617N3E1
TS3617N11E3
TS3617N11E1
TS3617N11E2
TS3617N12E4
TS3617N12E5
TS3617N12E6
TS3617N12E7
TS3617N13E8
TS3617N13E9
TS3617N13E1
TS3653N1E1
TS3653N1E2
TS3653N1E3
TS3653N2E4
TS3653N2E5
TS3653N2E6
![]()
![]()
![]()
In the output, only the selected attributes for the objects chosen in the previous step will be returned. For an overview of available objects and output options for each component of WinCC, please refer to the chapter "Project documentation".
The object "Single Messages" allows you to output all, or individually selected, messages from Alarm Logging in a report. The object is located in the Page Layout Editor object tree, in the "Project documentation" tab under "Alarm Logging CS". Requirements ● Messages must be configured in Alarm Logging. ● The object "Single Messages" has been inserted in the layout, and selected. ● The Object Properties window is open, and the Link tab is active. ● You are familiar with the Link tab. Edit Options Of all the objects for the Alarm Logging project documentation, the object "Single Messages" is the only one that provides the option to select your output data. For further information, please see the chapter "Project documentation in Alarm Logging
. Open the branching node on the left of the Link tab. Select the entry "Single messages". The list of editing options will then show the item "Selection". 2. Double-click on the entry "Selection". The Alarm Logging CS dialog: Selecting Single Messages dialog is opened.
If the "All single messages" checkbox is checked, all configured single messages that are available at the time the report is generated will be returned. The buttons for accepting the messages will only be enabled when the checkbox "All single messages" has been deactivated. 3. Select the desired items from the list of available single messages and add them individually or in groups, using the dialog buttons, to the list of selected single messages. 4. Confirm the selection with "OK". 5. Modify the external form of the object "Single Messages", if necessary, by changing the attribute values in the Properties tab. 6. Close the "Object Properties" window and save the layout.
The object "Archive" allows you to output the configuration data of user archives in a report. The object is located in the Page Layout Editor object tree, in the "Project documentation" tab under "User archive configuration". Requirements ● A user archive must have been created. ● The object "Archives" has been inserted in the layout, and selected. ● The Object Properties window is open, and the Link tab is active. ● You are familiar with the Link tab. Edit Options The objects "Archive" and "Views" are available for the project documentation of the user archive configuration. Both objects offer options to select data for output. For further information about the "Views" object, please see the chapter "Changing output options for the selection of views". Procedure 1. Open the branching node on the left of the Link tab. Select the entry "Archives". The list of editing options will then show the item "Archive selection". 2. Double-click on the entry "Archive selection". This will open the Archive selection dialog.
If the "All" checkbox is checked, all configured archives that are available at the time the report is generated will be returned.
From the list of available archives, select one or more for output. 4. Activate the check boxes for the archive attributes which you want to appear in the report. 5. To include archive field information in the output, activate the checkbox "Display fields". 6. Activate the check boxes for the field attributes which you want to appear in the report. 7. Confirm the selection with "OK". 8. Modify the external form of the object "Views", if necessary, by changing the attribute values in the Properties tag. 9. Close the "Object Properties" window and save the layout.
If multiple user archives were selected, the selection of archive attributes will be applied to all selected user archives. If the checkbox "All" is activated, the configuration data of all user archives within the WinCC project will be returned. The selection of archive attributes applies to all user archives in this case as well
| ID of the user archive or field. | Shows whether a user archive belongs to the type Limited or Unlimited (maximum number of data records limited or unlimited). |
| Name of the user archive or field | |
| Alias name of the user archive or field. |